| Active
D-Lighting, be careful!
|
| |
I am going to
upset some people, because I
will be the first to point out that the Emperor has no clothes. There
are some things about Active D-Lighting that are counter intuitive and
no one has pointed this out, yet. I am going to
point out that there are only
two instances in which you ought to use ADL. Both require that you use
matrix metering and ADL set to Auto. The first is where you have to
include a fully sun illuminated scene AND a shaded or interior scene
like a room with good window lighting or the shade of a large building.
The second is when using stage lighting where there is shadow area that
needs to be included. In most
situations, there are about five
zones, or stops of light, such as the still life shown in the header.
Black and white objects illuminated by the same light source require
only five zones to hold all the detail. The sunny sixteen rule says
that an ISO 100 setting requires 1/100th shutter speed and f16. It
further states that a shady eight day or the shade side of a building
or a large tree requires f8. The f11 perfect day is part sun and part
shade. Armed with this knowledge, you can take a lot of pictures in
manual exposure mode. Knowing that
the difference between the
light on the North and South sides of any building in any hemisphere is
two stops and you are going to take a picture where the average light
is two to three stops different from the shade scene to the sun scene.
This means we have to find two or three extra stops to include the
details of the typical ADL scene. Before it rolls
off the top of the page, I
need to point out where the stops are that are on the histogram above.
The frame is delineated into four segments in each axis. At this
point I wanted to define what you see in the histogram as it relates to
exposure. I made a series of exposures of test targets to prove what
must be obviously true. It didn't happen. The only thing you can say is
that the center vertical line represents 128 or the supposed middle
gray value of a gray card. You would expect that line to be the lower
boundary of the first stop of white, but it is not, because the sensor
has non linear output and the camera has applied an S curve of its own
and the x axis is supposed to represent input values, but in fact the
histogram along the x axis represents the scaled output values. The
height of the spikes on the histogram represent the count of the number
of occurrances of the value on the low axis. The numbers 0 and
255
on the vertical axis have nothing to do with the scale value of
the histogram. Left of center
represents many more stops of exposure than the right. How many? It
depends on the contrast, but for all practical purposes it is infinite.
Each stop moving towards black has half as many units as the current
stop. The right side although having some compression is finite and
when
255 is reached, that is the limit and information is lost. The two
right hand segments constitute the two first bright stops or zones. You
can
see that there is 1/2 stop on the right that is not used. The tall peak
of the histogram is the white wall. The shorter peak in the same
segment is the gray cards on the table and behind the objects. The
center line represents 127 or 7F in hex. The line at the left is the
next stop boundary and represents 63 decimal or 3F in hex and is the
second stop. If we draw an imaginary vertical line midway between the
63 line and zero we have the third stop down. We then create the fourth
stop or zone which has half as many steps and so forth until the steps
are very small. Theoretically this can go on forever. Remember the
riddle that a man can walk half
the distance to his destination on the first day and then half the
distance on each day thereafter? When does he reach his destination?
The
answer is, never. This is true of our light problem. The black end of
the spectrum is like a black hole of data especially when you have a
raw file which has 16 times the steps as a JPEG file at 255. So what
happens on the bright end of the histogram? Any value that exceeds 255
stays 255. No new data is recorded beyond 255. It is the job
of the camera and photographer
to prevent data from being lost and that is what the magic is in
D-lighting. Nikon knows that eight out of ten photographers would
rather poke a stick in their eye than to set the camera to low
contrast. Everybody knows what low contrast does. It make a flat
lifeless print. The solution? Give it a new name. Call it something
positive like "Active", "D-Lighting", but don't call it low contrast. Matrix
metering knows when the scene
itself has higher than normal contrast and so it can anticipate that
first in camera contrast and lower the exposure by 1/3 of a stop for
each step to accommodate for the extra space needed by the too bright
scene. It would be foolish to try to anticipate how many steps to take
in such circumstances, so let matrix metering compute the settings
automatically by setting ADL to auto. In auto, if you don't need ADL
then contrast is not lowered and exposure is not decreased.
In review of
the methods used to control
exposure I would like to point out some facts we have learned. We must by all
means possible prevent over
exposure, because overexposure causes data loss in the highlights. If
you must err in exposure, then underexpose. Data is never lost in the
shadows. You must get the exposure right in order to center the data in
the histogram so it can be manipulated by the conversion from raw to
something useful such as print making or web publishing. In my
experience that means setting the exposure bias to -1/3 EV on my
particular camera in the Standard Picture Control. I have become
accepting of seeing the left side of the histogram pile up instead of
gently sloping to zero. One of the things I have begun to see is that
slope to zero on the left of an ADL exposure. I think many
photographers including me have tended towards high contrast when lower
contrast would have been more appropriate. Auto
Adaptive D-Lighting will additionally
reduce exposure by up to one stop as needed to protect the highlights
as required by measuring the range of values between black and white.
Remember the exposure needs be reduced to either compensate for the
overly contrasty subject or the camera's addition of contrast by a flat
subject. Applying anything other than Auto ADL leaves you at risk of
making a fatal result. Off or Auto is the only choice for me.
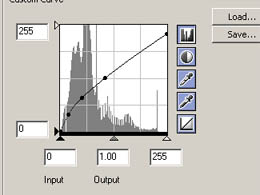
A curve can be
designed to minimize the
chances of overexposure but cannot help in the case of gross
overexposure. The curve you design is geometrically added to the base
curve of the picture control and can result in a curve with a step in
it. Note on the curve to the right that the value of 255 is
translated to something less than 255 on the output. D50 and D70
owners are fortunate that they
can shoot flash in the bright noonday sun to remove face shadows
because of the fast 1/500 sync speed of the electronic shutter on those
cameras. The mistake I make most since getting the D90 is that if I
leave any part of the camera in auto mode and if my aperture is f8 or
lower the auto ISO will cause my picture to be overexposed because it
will not go down below ISO 200. Using the rule of thumb for exposure my
exposure should not be brighter than f11 at 1/200 at ISO 200. The D90
will not set shutter speed above 1/200 with the flash on and the
default shutter speed for auto operation is limited to 1/60. I am
forced to set the camera in manual at f11, 1/200 auto TTL flash at -.3
EV or less and auto ISO off and set to L1 to 200. That does not leave
much wiggle room and if I forget to set auto ISO off will result in
overexposed pictures. In the next
chapter we are going to consider
what can be done after the picture is taken.
|
|
||||
|
Chapters: 1 History of curves and programmable contrast and gamma 2 Picture Control and Picture Control Utility 3 Creating and installing Custom curves in the camera 4 How to design a curve for your needs 6 D-Lighting applied after the shot 7 Where to go for more information © Leon Goodman 2009 |
|